Sinewaves with a Grayscale Map

timeline_sines

1. What’s wrong with Wave Warp

Wave warp is a pretty outdated effect that may still do the job for light distortion, but the antialiasing toggle does not work, and changing your comp color depth won’t do any good, resulting in this:

timeline_sines 2019-02-27 05.44.32 PM

I wanted to create a long trail of strokes in the shape of sine waves, pretty identical to what the wave warp effect is doing, but results were so ugly when trying to create bigger waves that I had to come up with my own solution. So here is goes…

2. Understanding grayscale map

Grayscale maps are used all over the post production pipe line, to create luma mattes, distortion maps, driving animations and so on. The idea is simple, use the luminance value of an image to affect another property.

remapping values

Comp 1 2019-02-26 06.45.08 PM

I will use the displacement map effect with only vertical displacement; to create the biggest sine in my example, the max value is set to 100, which means my gradient will affect the pixel displacement of -100 when black, 100 when white and 0 when 50% gray.
  • Create a rectangle shape layer the size of your comp by double-clicking the rectangle tool in the toolbar
  • remove the stroke and change the fill mode to gradient; the default gradient is a ramp, make it fill the screen by changing the start/end point
  • Create your line, easiest is to create a rectangle using the same process and change its height to 0 with a stroke instead of a fill
  • Add a displacement map effect (in distort menu) and change the map layer to the gradient shape layer, using luminance on both horizontal and vertical, and change max values to 0 and 100

We now have a smooth diagonal; let’s start by making a saw wave.

  • On the gradient shape layer, add a repeater, change copies to 10, and set the position to the size of the comp (1920 if 1080p default comp).
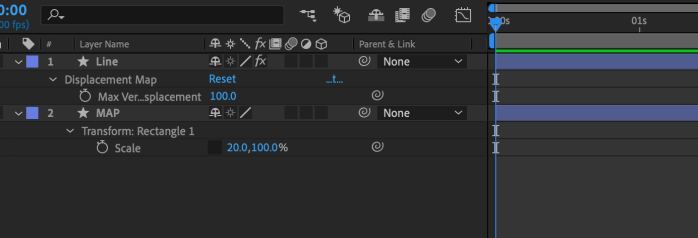
  • Now on the rectangle transform, first move the anchor point to the left edge of the comp, and change the x scale size to a lower value, like 20%

We now have 5 identical shorter diagonals.

Comp 2 2019-02-27 06.20.35 PM.png

  • Edit the gradient shape, start at white, end at white and add a 100% black color right in the middle

Now it’s a triangle wave

Comp 2 2019-02-27 06.24.13 PM.png

Let’s smooth the handles on the gradients to create a curvy look

  • Edit the gradient and add two 50% gray color points, right at 25% and 75%
  • Change these 2 points handles location at 66,66% on the left and 33,33% on the right

Screen Shot 2019-02-27 at 6.29.39 PM.png

now that we have a sine wave, we can adjust the period and amplitude by changing the scale value on the gradient rectangle transform property, and max vertical value on the displacement map effect.

Screen Shot 2019-02-27 at 6.33.31 PM.png

3. Damping

To replicate the pinning parameter of the wave warp, I will overlay on the top of my gradient another ramp gradient

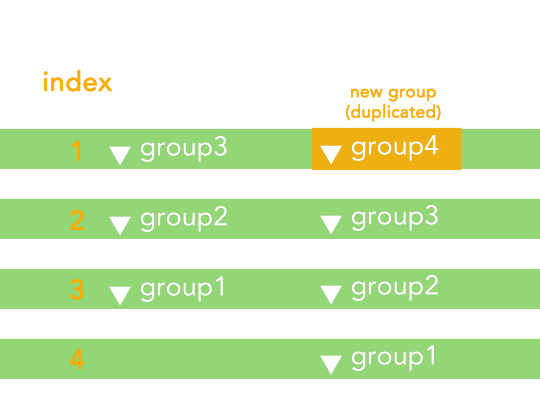
  • Duplicate the rectangle group containing the gradient rectangle in the map shape layer
  • Delete the repeater and reset the scale
  • Edit the gradient: remove all colors and make start / end point both 50% gray
  • On the top there are 2 color pickers that control the opacity; make the 1st one 0%

Now we have a sine which amplitude increase to the left

Screen Shot 2019-02-27 at 6.40.56 PM.png

4. Animate

  • To make the sine move, we only need to animate the position of rectangle group containing the repeating gradient.
  • If you see a break point, make the rectangle shape slightly bigger, of 1 or 2 pixels.
  • if you see some chunkiness, change your project color depth to 16bpc
  • You can now hide the gradient map shape layer!

Thanks for reading, I want to publish more about how I use grayscale images in my workflow, so stay tuned!

DON’T FORGET
build your own presets collection to speed up your workflow
Click icon below to download the AE project (rename .key to .zip after download)

download


parallax: add 3d depth to a multi-layered image

Learn how to move layer along the Z axis to add depth to your composition without affecting the proportion of the original image

12-00

1. Setup

Start by importing your multi-layered AI or PSD (choose to import as composition, not rasterized footage), or create your 2D artwork directly in AE.
Then turn on for each layer the 3D layer toggle and add a camera to your comp.

12-01

2. Expression writing

First thing to notice is, when creating a new camera, is

camera.position[2] = cameraOption.zoom = cameraOption.focusDistance
Any layer positioned at [0,0,0] will be exactly at the same place and will keep the same proportions when looking through the camera.

Distance to Camera

13-01

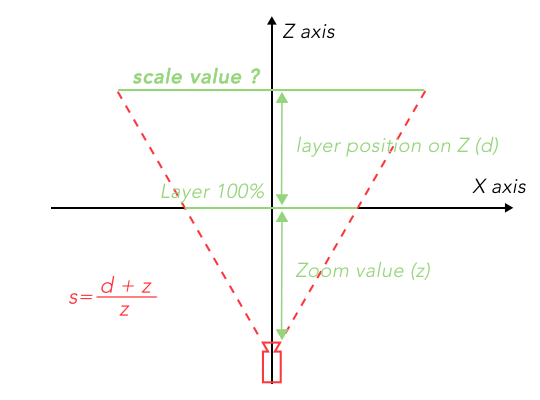
note that the absolute distance between the camera and the object along the Z axis is z + d

  • Add an expression on the scale scale property of any of the layer
var z = thisComp.activeCamera.cameraOption.zoom;
var d = position[2];
scale * ((d + z) / z)

Note that the first line of code instruct to retrieve the active camera zoom value.

  • Copy the expression
  • Reveal the scale property of all the layers in 3d space: select the layers and type’s’
  • paste the expression

Now when moving a layer along the Z axis, it will look as if nothing happens, but if you select the top view, you can see its actual position. You will still be able to scale up/down any layer.

You might be interested by Paul Tuersley’s Multiplane script that automates this method plus automatically distribute layers along Z axis.

12-04

DON’T FORGET
build your own presets collection to speed up your workflow
Click icon below to download the AE preset (rename .key to .zip after download)

download

Car Rig

Learn how to create a simple but effective car rig

12-00

1. Setup

this simple car rig will automate the rotation of the wheels and the orientation of the car along the motion path. You can use your own car model imported from Photoshop or Illustrator, or create it directly in AE with shape layers. Make sure that each wheels are on a separate layer, and that anchor point is centered.

The simplest hierarchy would be 3 layers:

  • Car body
  • Front wheel
  • Rear wheel

Start by creating the road to be used as a motion path; again, the easiest way would be to create it directly in after effects using shape layers, but you can also import an external file. Doing so will require an extra step, you need to create a mask to outline the curves of the road.

12-01

2. Drive!

  • Create a new Null Object(“Drive”)
  • Copy the position property of the front wheel to the Null Object(“Drive”)
  • Use the pick whip to link all the car layers to the Null Object(“Drive”)
  • Copy the road path from your shape layer or the mask outline to the position property of the Null Object(“Drive”). Make sure you copy the Path and not the object/mask to the position property.

Because the motion path moves the object along its anchor point, we need to offset the Y position of half the diameter of the wheel.

  • Add an expression to the Null Object(“Drive”)

If you used a Shape layer, it is easy, you need to get the diameter from the ellipse shape property:

var d = thisComp.layer(“wheel_F”).content(“Ellipse 1”).content(“Ellipse Path 1”).size[0];

If you imported the layer and don’t know the exact diameter, the easiest will be to create an Effect > Expression Controls > Slider Control, and adjust manually.

var d = effect(“Slider Control”)(“Slider”);

End the expression code with:

[value[0],value[1]-d/2]

We only want to affect the Y position (second value in the array) by half of the diameter (-d/2)

3. Orientation

If you toggle on Transform > Auto-orient > Along the path, you can see that the result are more than unexpected. It orients the front wheel, without taking into consideration the rest of the car.

We will solve this problem with an expression on the Null Object(“Drive”) comparing values over time.

  • Remove Auto-Orient if you toggled it on
  • Add an Effect > Expression Controls > Slider Control to Null Object(“Drive”) and rename it to offset.
  • Add an expression to Null Object(“Drive”).rotation; first store the new controller value and convert decimals to Frames for more flexibility*:
var offset = framesToTime(effect(“offset (in frames)”)(“Slider”));

*time is evaluated in seconds in expressions, not in frames

  • Create 2 variables to store the positions at current time and past time
var from = transform.position;
var to = transform.position.valueAtTime(time-offset);
  • The last part of the expression evaluates the distance between the 2 wheels; if you don’t understand it, please review the previous topic Line Connectors
radiansToDegrees( Math.atan2( from[1]-to[1], from[0]-to[0] ) )
  • Adjust manually the slider(“offset”) so that the rear wheel touches the ground (in positive values)*

*This value depends on the speed (time between the start/end keyframes of the position animation) and the distance travelled in pixels. It should be possible to accumulate values over time to evaluate it, but honestly, it is easier and faster this way.

This setup is not perfect, you will notice sometimes the rear wheel does not stick exactly to the road when the road distortion is heavier. It has to do with the distance between the 2 wheels being forced to always stay the same, despite the distance travelled. But the viewer should not even notice it so why bother? You can still adjust manually if it is really noticeable.

12-02

4. Wheels rotation

  • Use the pick whip to link the rotation of the rear wheel with the front wheel

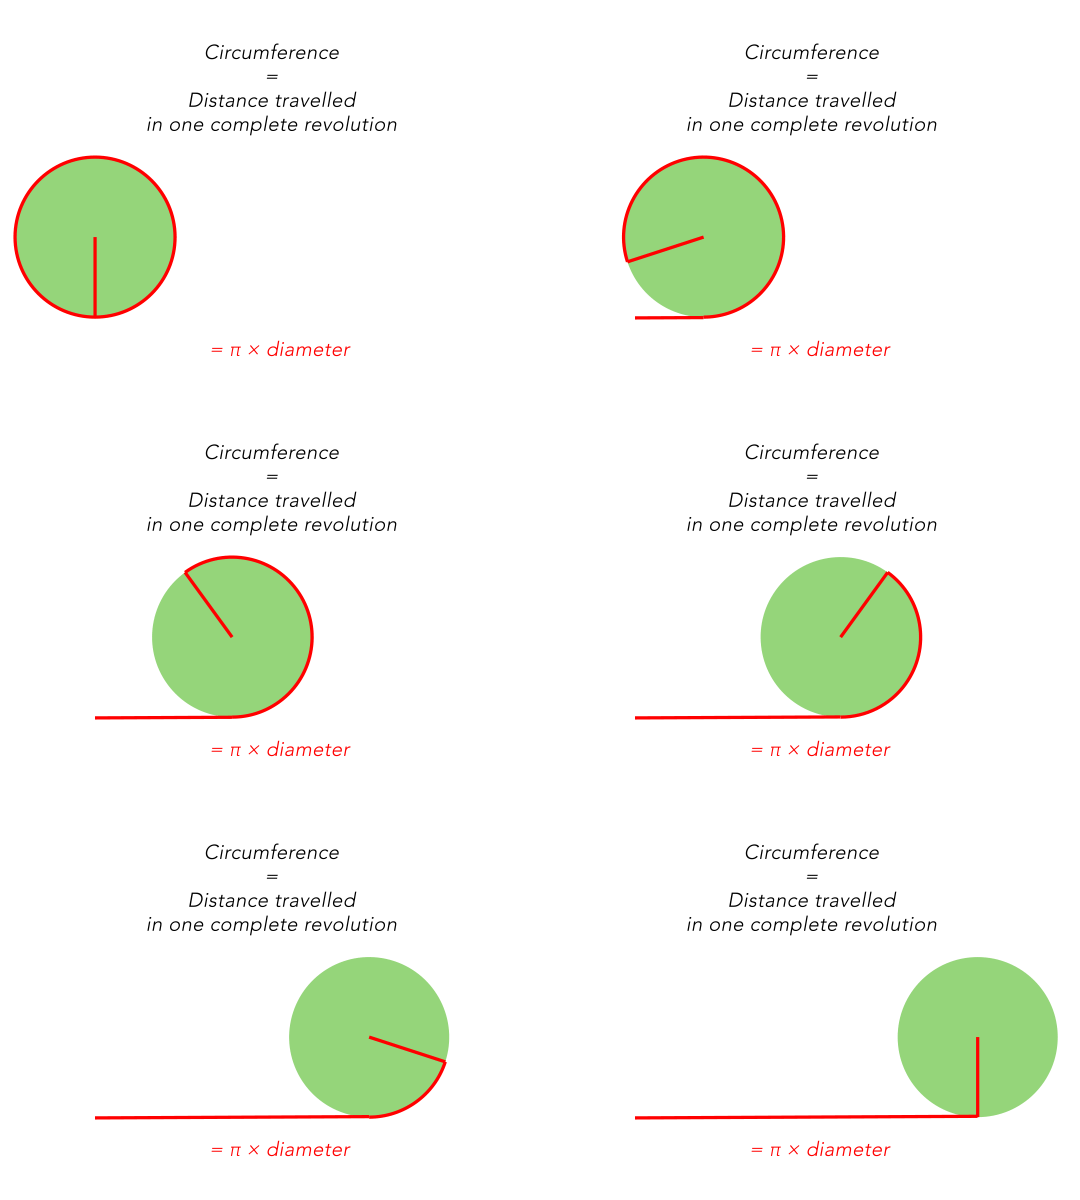
Geometry: circumference ?

12-03

  • Add an expression to the rotation to store the variables
var d = content(“Ellipse 1”).content(“Ellipse Path 1”).size[0];
var p = thisComp.layer(“Drive”).transform.position;
  • Write the expression result : 360º / Circumference * Position

360 / (Math.PI*d) * p[0]

This expression evaluates the rotation speed (360/C) and uses X Position to know how many pixels the car travelled. You can check out CreativeCow Vehicle rig for a more in depth explanation.

12-04

DON’T FORGET
build your own presets collection to speed up your workflow
Click icon below to download the AE project (rename .key to .zip after download)

download

Errors ?

Learn how to deal with errors

1. AE CC 2015 (13.5)

Finally, Adobe decides to change the way expression errors are handled in AE, expressions toggle is no longer disabled if expression is not valid. Instead it displays a warning message and a warning icon next to the expression; clicking on it allows to access the error message.

It will also handle temporary errors; for example in the previous topic Subtitle track from an external file, when using markers, we created an if/else condition to avoid looking for marker 0.

{ if (m == 1) {“”} else

This is no longer required, as it will not disable the expression because of a unique event.

Read the official Adobe blog post here : http://blogs.adobe.com/aftereffects/2015/06/changes-to-expressions-in-after-effects-cc-2015-13-5.html

2. And before 2015 ?

To prevent unique or specific errors, you could make a set of if/else conditions; but if something is missing, for example applying the color expression from topic Color Palette / Swatches without having the color swatches in the timeline (or forgot to rename the layer to “colors”), that would not prevent from disabling the expression.

try {code} catch(err) {code}
acts like a conditional statement;
It tests the block of code for errors, if no errors it is executed,
if errors are found it will execute the alternate code specified in the catch(err)

read more about javascript errors here : JavaScript try/catch/finally Statement

3. Reactivate

Let’s say you deleted by mistake a master layer to your expressions, then they all are deactivated; even a Cmd+Z won’t bring them back to life. Oh yeah, you know what I am talking about, revealing all expressions to re-enable them one by one while lashing yourself and cursing the world you live in!

ActivateDisabledExpressions is a free script that will save your life; it will look for the disabled expressions and batch – reactivate them.

If you have a few bucks to spend, I highly recommend to Paul Tuersley’s ExpressEdit 2, a great script that can find disabled expressions, but also can be used as an expression library to save your codes, search for specified and batch apply expressions to selected layers.

Line Connectors

Learn how to create a line between 2 layers

REMINDER
If you are an absolute beginner, please start your learning by checking the essential resources below:
http://www.jjgifford.com/expressions/basics/index.html
https://helpx.adobe.com/after-effects/using/expression-basics.html
http://www.motionscript.com

1. Setup

  • show the grid and the rulers, and activate snapping (from the “view” menu in the menu bar).
  • draw a line shape from the center of the composition to +100px to the right; for example, if you work in 1920×1080, draw a line from [960,540] to [1060,540]
  • rename shape layer to “line”
  • Create 2 shape layers, conveniently renamed “from” and “to”, or import the assets that you want to link with a line, and make sure both layers anchor points are centered.
  • Reposition one layer to the right, and the other to the left side of the composition.

2. Expressions

  • Add an expression to shape layer(“line”)> shape 1> Position, to link the line start point to the Layer(“From”)
toComp / fromComp
convert point space to composition space
Shape Layers transform controls are relative to the composition center,
[0,0] in the shape layer space is the center of the comp [960,540].
fromComp(thisComp.layer(“from”).transform.position)
  • Add an expression to shape layer(“line”)> shape 1> Scale, to evaluate the distance between the 2 objects
length(point1,point2)
evaluates the distance between 2 points
var from = thisComp.layer(“from”).transform.position;
var to = thisComp.layer(“to”).transform.position;
[length(from,to),value[0]]
  • Add an expression to shape layer(“line”)> shape 1> Rotation, to orient the line to point to the destination object

Geometry: what is an arc tangent ?


Math.atan2(x,y) evaluates the counterclockwise angle in radians (not degrees)
between the positive X axis and the point (x, y).
radiansToDegrees() / degreesToRadians() convert angle measuring units

var from = thisComp.layer(“from”).transform.position;
var to = thisComp.layer(“to”).transform.position;
radiansToDegrees( Math.atan2( from[1]-to[1], (from[0]-to[0]) ) )-180

Because Math.atan2() evaluates counterclockwise, substract to the result 180º

  • pull out “Stroke 1” object out of “Shape 1” group and put it down in the stack, so that the stroke is rendered after transformation. You can also delete “Fill 1” object.

3. Fake Elasticity

  • Add a zigzag object under the group, change Ridges per Segment to “1” and Points to “Smooth”
  • Add an expression to shape layer(“line”)> ZigZag 1> Size, to determine the maximum size of the line and distort the line depending on the distance between the 2 layers
var from = thisComp.layer(“from”).transform.position;
var to = thisComp.layer(“to”).transform.position;
var maxd = 960; //manually adjust the maximum length
(maxd-length(from,to))/4

ZigZag works like a sinusoid, distorting in both Y and -Y

  • Add an expression to shape layer(“line”)> shape 1> Anchor Point, to shift the line position depending on the Zigzag distortion intensity
[value[0],content(“Zig Zag 1”).size]

4. Alternative routes

The oldest method around is to use Effect> Generate> Beam and link Starting / Ending Points to both layers positions. This methods can be good enough if you need only a few lines and don’t need to stylize them. But if you have more than 5 lines then render time can increase dramatically.

Motion Boutique released a while ago Connect Layers, a free script originally made as a debug tool for Plexus, that works wonders to create rendered line connectors, elastic ropes and triangulations. But you will have to re-render keyframes each time you modify the animations.

Lastly, it is worth mentioning Lines creator, a quite expensive script ($25) that automatize the method explained in this post.

DON’T FORGET
build your own presets collection to speed up your workflow
Click icon below to download presets (rename .key to .zip after download) download

Bonus – Free transitions pack

Here is a pack of presets I made using expressions; it can easily be customized by duplicating groups to add more elements and automatically cycle colors (you will need the color swatch preset from previous lesson07). Expressions controls make it easy to retime, randomize and add delays. inPoint of the shape layer is being used as the start point for the time interpolation. Have fun with the freebie!

AExpr transition pack from toma ever on Vimeo.

DOWNLOAD PRESET PACK HERE
Click icon below to download presets (rename .key to .zip after download)

download

Lesson09 – Transitions

Learn how to create motion graphic transitions
REMINDER
If you are an absolute beginner, please start your learning by checking the essential resources below:
http://www.jjgifford.com/expressions/basics/index.html
https://helpx.adobe.com/after-effects/using/expression-basics.html
http://www.motionscript.com

I have seen all over the internet these graphic transitions packs for sale, sometime for prices as high as 20-30$. Why paying for it when you can make it yourself and understand how to customize it ?

1. Understand the Basic Setup

  • Shape Layers have a few built-in effector objects such as Merge Path, Repeater, Trim Paths… Great functions to create symmetries and space offsets.
  • There is no time effectors built in the Shape Layer library; we will use .valueAtTime or group indexes instead to create time delays between instances. Please review Lesson08 – Delays and Loops
  • Automate colors offset, using customized color swatches; Please review Lesson07 – Color palette

2. Cascade Strokes

  • Create a new Rectangle Shape Layer by double clicking on the Rectangle Tool in the Menu Bar
  • Rename Shape Layer> Content> Rectangle 1 to 01
  • Navigate down to Shape Layer> Content> 01> Rectangle Path 1> Size and flatten the X size
[0,thisComp.height]
  • Turn off the Fill and change the Stroke Width value to around 80 (for now)
  • Add two Repeaters in “01” Group
  • Change on the 2nd repeater Copies property to 2,
    Transform> Position to 0
    Transform> Scale to [-100, 0]
    rename the repeater to Mirror.

We will now create a link between the Composition Width Repeater and Stroke Width, so that the screen is always filled with the graphics, whatever the number of repetition is.

  • Add an expression to Shape Layer> Content> 01> Repeater 1> Transform> Position, to link the repeater position offset to the number of Copies.
var i = content(“01”).content(“Repeater 1”).copies-1;
var w = (thisComp.width/2)/i;
[w,value[1]]
  • To create a Y offset evolving over time, add a second variable
var h = easeIn(time, inPoint, inPoint + 1, -thisComp.height/i,0);
[w,h]

If we wanted the animation to last 2 seconds, we would write inPoint + 2 instead, or even create an Expression Control to adjust manually with a slider.

  • Add an expression to Shape Layer> Content> 01> Stroke 1> Stroke Width
Math.ceil(content(“01”).content(“Repeater 1”).transform.position[0])

Using Math.ceil will make the stroke size pixel perfect and avoid undesired alpha anti-aliasing problems.
Now if you adjust the repeater copies property, the graphic will adjust automatically to fill the screen with the copies.

  • Animate with a linear interpolation Shape Layer> Content> 01> Rectangle Path 1> Position, from -height to 0
linear(time, inPoint, inPoint + 1, [0,-thisComp.height], [0,0])
  • Modify this expression to add a time delay when duplicating the group
var offset = (thisProperty.propertyGroup(3).name-1)*(4/25);
linear(time, inPoint +offset, inPoint +1 +offset, [0,-thisComp.height], [0,0])

When duplicating the Group (“01”), the group name with increment of +1, adding a time delay of 4 frames in between each instances.

  • Modify the expression on Shape Layer> Content> 01> Repeater 1> Transform> Position
var offset = (thisProperty.propertyGroup(4).name-1)*(1/25);
var h = linear(time, inPoint +offset, inPoint +1.5 +offset, -thisComp.height*4/i,0);

Note I choose this animation to last 50% longer to make the cascading effect more obvious.

  • Modify the expression on Shape Layer> Content> 01> Stroke 1> Stroke Width to create gaps in between the bars that will disappear over time
var w = content(“01”).content(“Repeater 1”).transform.position[0];
Math.ceil(linear(time, inPoint, inPoint +1.5, w/2,w))
  • (Optional) Change Shape Layer> Content> Rectangle 1> Stroke 1> Line Join to Round Join
  • (Optional) Apply Xpr_swatches to the composition and xpr_colorShape to the stroke color (from Lesson07 – Color palette) to automatically cycle through colors defined in the palette.
  • Duplicate the Group (“01”) as many times as you like

3. Circular Strokes

  • Create a new Ellipse Shape Layer by double clicking on the Ellipse Tool in the Menu Bar
  • Rename Group (“Ellipse 1”) to (“01”)
  • Add an expression to Shaper Layer> 01> Ellipse Path 1> Size
var n=thisProperty.propertyGroup(4).numProperties;
var i=thisProperty.propertyGroup(3).propertyIndex;
var r=(width/n)*i;
[r,r]

That code will determine the size of each Ellipse instance; n will get how many instances are living in the same Shape Layer and i the index of that particular instance (review previous lessons if you don’t get it).

  • Add an expression to Shaper Layer> 01> Stroke 1> Stroke Width
var i=thisProperty.propertyGroup(3).propertyIndex;
var r=thisProperty.propertyGroup(3).content(“Ellipse Path 1”).size[0];
(r/(2*i))

Stroke Width will depend of the number of instances and the Size of that particular instance

  • Add an Offset Path object and add an expression to Start property
100-thisProperty.propertyGroup(3).content(“Trim Paths 1”).end
  • Add a Trim Path object and add an expression to Amount
-thisProperty.propertyGroup(3).content(“Stroke 1”).strokeWidth/2

This trick constrains the stroke inside the ellipse and creates a dohnut shape instead of an outlined stroke.

  • Add an expression to the End Property and introduce a time delay
var offset=(thisProperty.propertyGroup(3).propertyIndex-1)*2/25;
linear (time, inPoint +offset, inPoint +1 +offset, 50, 100)

That expression animates over 1 second the stroke, introducing 2 frames delay between instances

  • Modify the expression on Shaper Layer> 01> Stroke 1> Stroke Width to thicken the stroke over time and create a “filling gaps” effect
var k = linear (thisProperty.propertyGroup(3).content(“Trim Paths 1”).end, 50, 100, 0,1);
k*(r/(2*i))

this creates a multiplicator that animates doubles the size over time, following the pace of the Trim Path animation.

  • Change Shape Layer> Scale to [115,115], to fill the frame
  • (Optional) Add an expression to Shaper Layer> 01> Trim Path 1> Offset to introduce a random effector
random()
Returns a random value between 0 and 1 (or specified Max/Min values)
seedRandom(offset, timeless=false)
Random seeds are evaluated relatively to the layer indexes;
use it to offset the values but also to freeze the values in time
seedRandom(2, timeless = true);
random()*50
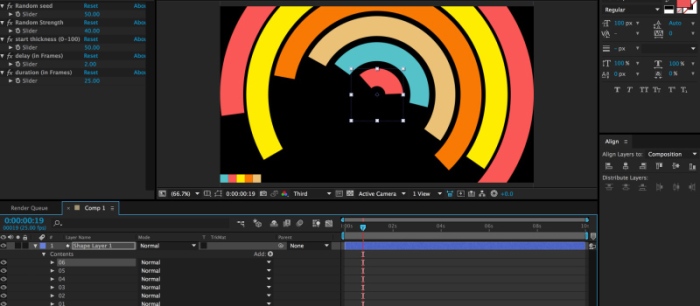
  • (Optional) Add 2 Effect> Expression Controls> Slider Control to manually adjust the randomization and Modify the expression
seedRandom(effect(“Random seed”)(“Slider”)+thisProperty.propertyGroup(3).name, timeless = true);
random()*effect(“Random Strength”)(“Slider”)

Note that to generate a unique seed for each instance, the number of the instance is used to automatically offset it.

  • (Optional) Apply xpr_swatches and xpr_colorShape to automatically select colors from a specified color palette
  • Duplicate the main Group as many time as desired and adjust random sliders

4. Triangles

  • Make a new Polygon Shape by double clicking ont he Polygon Tool in the menu bar
  • Change the Polygon Path points to 3 to form a triangle
  • Rename the main Group to (“01”)
  • Add an expression to Shape Layer> 01> Polygon Path 1> Radius to scale the size of the triangle to match the compostion height by
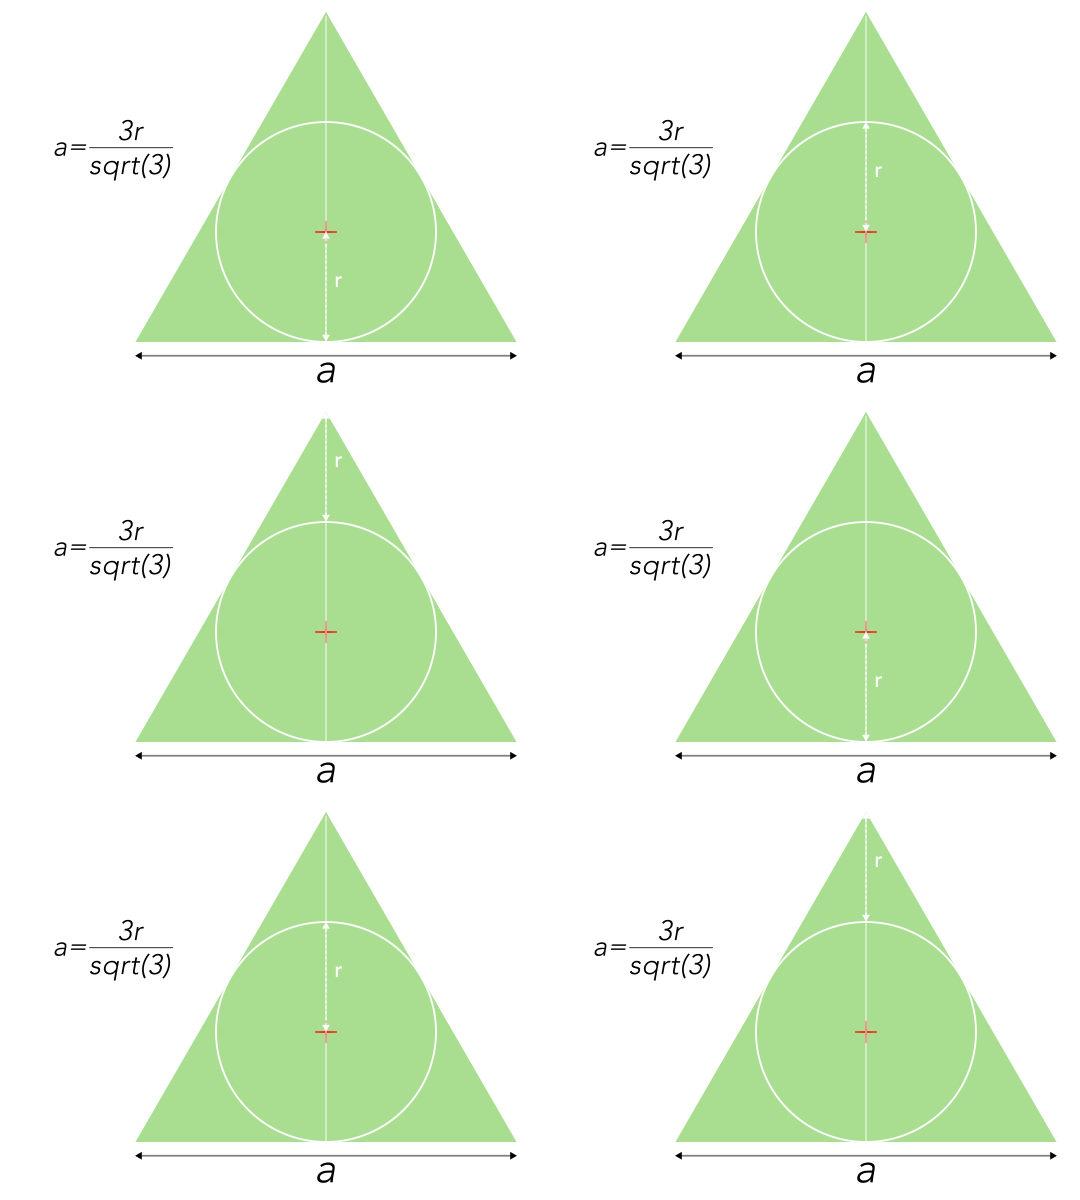
The “Outer Radius” of the triangle in After Effects
refers to the inscribed circle radius
(2/3)*thisComp.height
  • Recenter the triangle in the compo by adding an expression to Shape Layer> 01> Polygon Path 1> Position
[0,(1/6)*thisComp.height]
  • Add a Repeater in the Group
  • Change the Repeater Rotation to 180
  • Add an expression to the Position property to offset each iteration (see graphic above about relationship between radius and triangle side)
var r = thisProperty.propertyGroup(4).content(“Polystar Path 1”).outerRadius;
var a =3*r/Math.sqrt(3);
[a/2,value[1]]
  • Add an expression to the Copies property to fill the screen (see graphic above about relationship between radius and triangle side)
var r = thisProperty.propertyGroup(3).content(“Polystar Path 1”).outerRadius;
var a = 3*r/2/Math.sqrt(3);
thisComp.width/a*2
  • Add an expression to the Group (“01”) Position to offset the position to the left edge of the frame
var p = thisProperty.propertyGroup(2).content(“Polystar Path 1”).outerRadius;
[-thisComp.width/2,-thisComp.height/2+p*(3/2)]
  • Add an expression to the Group (“01”) Anchor Point to offset the position to the left edge of the frame
var r = thisProperty.propertyGroup(2).content(“Polystar Path 1”).outerRadius;
var p = thisProperty.propertyGroup(2).content(“Polystar Path 1”).position[1];
[value[0], r-p]
  • Add a second repeater under the 1st one
  • Modify the expressions on Polygon Path Radius / Polygon Path Position to scale down the triangle size depending on the number of vertical iterations
(2/3)*thisComp.height/thisProperty.propertyGroup(3).content(“Repeater 2”).copies
[0,(1/6)*thisComp.height /thisProperty.propertyGroup(3).content(“Repeater 2”).copies]
  • Add an expression on Repeater 2> Position to offset the rows down so that it fills the screen
var r = thisProperty.propertyGroup(4).content(“Polystar Path 1”).outerRadius;
var a = r*3/Math.sqrt(3);
[-1.5*a, r*3/2]

By adjusting the 2nd Repeater Copies property, it will automatically resize the whole graphic to fit the screen.

  • Change Repeater 1> End Opacity to 50%
  • To animate the graphic, modify the expression result on the 1st Repeater Copies property with a linear expression
linear(time,inPoint,inPoint+1,0,(thisComp.width/a)*2)
  • To add a time delay in between the duplicated instances, modify the expression
var offset=(thisProperty.propertyGroup(4).numProperties – thisProperty.propertyGroup(3).propertyIndex)*10/25;
linear(time,inPoint +offset,inPoint +1 +offset,0,(thisComp.width/a)*2)

To invert the time delay, so that the top layer is always the last to appear, substract the number of instances to the instance index. If we just use the group index, then the top layer wouls always be the 1st to appear, masking the other groups underneath.

  • (Optional) Add the color swatches preset and the apply xpr_colorShape to the Fill object
  • Duplicate the main Group as many time as you like.

DON’T FORGET
build your own presets collection to speed up your workflow
Click icon below to download presets (rename .key to .zip after download)
download

Lesson08 – Delays and Loops

Learn how to create a looping delay / echo / cascade effect on your animation

REMINDER
If you are an absolute beginner, please start your learning by checking the essential resources below:
http://www.jjgifford.com/expressions/basics/index.html
https://helpx.adobe.com/after-effects/using/expression-basics.html
http://www.motionscript.com

1. Setup

  • Create a new Shape Layer, with a group including a path/shape and a color fill
  • Import the color swatches preset from previous lesson, and rename the layer to “colors”. Make sure no layer is selected in the timeline when importing the preset
  • Rename the group in the new Shape Layer to “01”
  • Add xpr_colorShapes preset from previous lesson to the Fill; colors are now linked to the name of the group and the color swatches. When duplicating the group, it creates a new instance using the next color.
  • Animate the position property of the Group (“01”)

2. Delay

  • Duplicate the Group (“01”) and delete the keyframes on the position property
  • Add an expression to Shape Layer> Group(“02”)> Transform> Position
  • Create a new variable to store the group name
var i = thisProperty.propertyGroup(2).name;
  • Create a new variable to store the reference Group (“01”) postion
var pos = thisProperty.propertyGroup(4).content(“01”).transform.position;

or

using the pickwhip to retrieve the path

  • Shift in time the position value
.valueAtTime(time)
Returns the value of a property at the specified time, in seconds.
pos.valueAtTime(time-(i-1))

This result will delay the second Group animation of 1 second. To change the delay influence, you can either directly add a mathematic operator to (i-1) or add an expression control for a more intuitive control over the delay

  • Route 1: mathematic operator
pos.valueAtTime(time-(i-1)*5/25)

Now the delay will only be of 5 frames (in a 25fps composition). Note that positive values will invert the delay, making the top layer coming first.

  • Route 2: expression controller; add a Effect> Expression Control> Slider Control
var delay = effect(“Slider Control”)(“Slider”);
pos.valueAtTime(time+(i-1)*delay)
  • Duplicate Group (“02”) as many times as you want and adjust Slider (“delay”) if you chose route 2

3. Built-in loop

This simpliest way to loop an animation is to use one of the loop built-in object

  • Reveal the set of keyframes on Shape Layer> Group (“01”)> Transform> Position
  • Without deleting the keyframes, add an expression to the Position property
loopIn/loopOut(type,keyframes)
use keyframes to loop on the specified interval

loopInDuration/loopOutDuration(type, duration)
use the inPoint/outPoint of the layer to loop on the specified duration

Most used types are cycle (default) and pingpong;
check built-in help for more

loopOut()

You don’t need to specify any parameter in the brackets to repeat the animation

  • Find the frame where you wish the loop to end and add a keyframe

4. Modulo loop

The built-in loop objects are most of the time enough, but they have limits; first animation needs to be most of the time precomposed, secondly, they can not coexist with other expression in a same block of code.

  • Delete the keyframes on Shape Layer> Group (“01”)> Transform> Position and replace them with a linear interpolation
linear(time, 0, 2,[-1080,0],[1080,0])

If you try to add a loop object on the next line, you will be prompted with an error message; loop object can not be added to a pre-existing block of code. But modulo (%) has no such limit, it is a basic mathematic operator that plays well with interpolations.

  • Edit the expression
linear(time%2, 0, 2,[-1080,0],[1080,0])

Every 2 seconds, the animation will loop; it would work perfectly if we did not have to take into consideration the delay. You could either adjust the loop duration manually to a value greater than the endFrame value, or create a set of new variables to get the exact delay duration.

  • Edit the expression
var delay = Math.abs(effect(“Slider Control”)(“Slider”));
var i = (thisProperty.propertyGroup(3).numProperties-1);
linear(time%(2+delay*i), 0, 2,[-1080,0],[1080,0])

by adding the delay * number of iterations, the loop matches exactly the animation length.

  • To smoothen in/out the animation, change linear to ease
ease(time, startFrame, endFrame, value1, value2)
generates a smooth interpolation
ease(time%(2+delay*i), 0, 2,[-1080,0],[1080,0])

Unfortunatety, velocity values are not accessible through expression; to get more control on the velocity, check out Ease and Wizz by Ian Haigh, a script with a nice collection of expressions that generate Expo, Circ, Quint, Quart, Quad, Sine eases, and more!

DON’T FORGET
build your own presets collection to speed up your workflow
Click icon below to download presets (rename .key to .zip after download)
download


Lesson07 – Color Palette / Swatches

Learn how to create a color palette/swatches to make a master control for your compositions colors

REMINDER
If you are an absolute beginner, please start your learning by checking the essential resources below:
http://www.jjgifford.com/expressions/basics/index.html
https://helpx.adobe.com/after-effects/using/expression-basics.html
http://www.motionscript.com

1. Color Swatches

  • Create a new Shape Layer and rename it to “colors”
  • Add an empty Group and rename it to “swatches”
  • Add a Group to Shape Layer(“colors”)> group(“swatches”) and rename it to “01
  • Add a Rectangle Path and a Color Fill to Shape Layer(“colors”)> group(“swatches”)> group(“01”)

Each rectangle will be a color swatch for the composition (and pre-comps too).

  • To automatically align duplicate of the swatch, add an expression to Shape Layer(“colors”)> group(“swatches”)> group(“01”)> Transform> Position
.propertyIndex
retrieves the index of the targeted property.
Note that Indexes increment as you duplicate them,
while numerical names keep the same value.
var x=content(“swatches”).content(“01”).content(“Rectangle Path 1”).size[0]*(thisProperty.propertyGroup(2).propertyIndex-1);
[x, value[1]]

Use the pickwhip to retrieve the path to the Rectange Path Size. With propertyGroup, get the index of the group and use shift the position of each (Check lesson04 to review propertyGroup argument)

  • To automatically position the color palette on the left corner, add an expression to Shape Layer(“colors”)> group(“swatches”)> Transform> Position
width gets the composition width
height gets the composition height
[-width/2,height/2]
  • Then on the Anchor Point, add another expression
var s=content(“swatches”).content(“01”).content(“Rectangle Path 1”).size[0];
[-s/2,s/2]

Use the pickwhip to retrieve the path to the Rectange Path Size.

Now duplicate the group(“01”) as many times as you want to create more swatches.
By changing the Shape Layer(“colors”)> group(“swatches”)> Transform> Scale , you can resize the color palette.

By making it a Guide Layer, while still showing up in the composition, I will be ignored when rendering without having to hide it.
Changes the colors to your client’s graphic guidelines, or use Window> Extensions> Adobe color themes to pick pre-made color schemes.

2. Link colors

Now each time you create a new Shape Layer, add a color correction filter or create a Solid Layer, you can link it to the corresponding color.

  • Create a new Polygon Shape Layer by click-holding the shape layer icon in the tool bar and polygon tool in the drop-down menu
  • Navigate down to the Fill property and rename it to “01”
  • Add an expression to the Fill Color
var select = thisProperty.propertyGroup(1).name;
thisComp.layer(“colors”).content(“swatches”).content(select).content(“Fill 1”).color

Use the pickwhip to retrieve the path to the 1st swatch fill color in Shape Layer(“colors”)> group(“swatches”)> group(“01”)> Fill 1> Color , then change (“01”) to (select)

By changing the name of the shape group to “02”,”03″,”04″… you’ll be adjusting the color.
Save the expression as a preset to easily apply the expression to all you colors.

For filters using colors, remember to rename the filter’s name instead.
You can also prefer to manually adjsut the expression rather than using the filters/layers/groups names, that is your call.

3. Auto-cyle colors

Let’s say we plan on creating a delay with multiples groups in a shape layer, and that we would like to have the instances to each have a different color.

  • First we need to know how many swatches in the palette
.numProperties
returns how many properties populates the group
var count = thisComp.layer(“colors”).content(“swatches”).content(“01”).propertyGroup(1).numProperties;
var select = thisProperty.propertyGroup(3).name;

Note that because we will duplicate the whole group, the color index this time is linked to the group name at .propertyGroup(3)

Modulo (value % threshold)
is a division reminder;
you can understand it as a loop operator:
each time a value reaches the threshold,
it will start again from 0.
0%5 = 5%5 = 10%5 = 0
1%5 = 6%5 = 11%5 = 1

4%5 = 8%5 = 14%5 = 5
  • To loop the colors, enter the result
thisComp.layer(“colors”).content(“swatches”)­.content(select%count+1).content(“Fill 1”).color

Modulo starts from zero but the color palette range starts at one, hence +1

DON’T FORGET

build your own presets collection to speed up your workflow

Click icon below to download presets (rename .key to .zip after download) download


Lesson06 – Counter and Text Formatting

Learn how to create a counter with auto-formatting

REMINDER
If you are an absolute beginner, please start your learning by checking the essential resources below:
http://www.jjgifford.com/expressions/basics/index.html
https://helpx.adobe.com/after-effects/using/expression-basics.html
http://www.motionscript.com

1. Counter Setup

  • Create a new Text Layer
  • Add an expression to Text Layer> Text> Source Text
var num= linear(time,0,1.2,0,125000)
num
This expression animates in 1.2 seconds the counter from 0 to 125000.

2. Auto-formatting

To create a counter using the formatting $125,000.00, a few changes needs to be done.
  • Modify the variable to keep only 2 decimals
.tofixed() converts a number into a string,
keeping a specified number of decimals.
var num= linear(time,0,1.2,0,125000).toFixed(2);
num
  • Constrain the counter to always display 8 digits

while (condition) {result}
executes & accumulates a block of code
until a specified condition is satisfied.

The Meyers’ Deeper modes of expression – while:
http://provideocoalition.com/f/story/dmoe7_decisions/P3

var num= linear(time,0,1.2,0,125000).toFixed(2);
while (num.length < 9) {num = “0” + num} {num}
Our string contains 9 characters ( 8 digits, 2 decimals and a point); the condition then must be that if the string is composed of less than 9 characters, run the code until there is enough.
For example, if the value is 36.00, it will run 6 times like this:
“0”+”36.00″ = “036.00”
“0”+”036.00″ = “0036.00”

“0”+”00036.00″ = “000036.00”Remember that we are adding strings and not numbers, when
0 + 0 + 0 + 0 + 1 = 1
“0” + “0” + “0” + “0” + “1” = “00001”
  • Split the number in two with a comma
.slice(start,end: up to, but not including)
extracts part of a string
negative values select from the end of the string.
var num= linear(time,0,1.2,0,125000).toFixed(2);
while (num.length < 9) {num = “0” + num} {num};
num.slice(0,3) +”,” + num.slice(3,9)
This new result splits the string in 2 parts and glue them back together with a comma in between.
  • Add a currency symbol
“$ “+ num.slice(0,3) +”,” + num.slice(3,9)
CHECK OUT!
Dan Ebbert’s universal counter:
http://www.motionscript.com/design-guide/counter.html
DON’T FORGET
build your own presets collection to speed up your workflow
Click icon below to download presets (rename .key to .zip after download) download