If you are an absolute beginner, please start your learning by checking the essential resources below:
http://www.jjgifford.com/expressions/basics/index.html
https://helpx.adobe.com/after-effects/using/expression-basics.html
http://www.motionscript.com
I have seen all over the internet these graphic transitions packs for sale, sometime for prices as high as 20-30$. Why paying for it when you can make it yourself and understand how to customize it ?
1. Understand the Basic Setup
- Shape Layers have a few built-in effector objects such as Merge Path, Repeater, Trim Paths… Great functions to create symmetries and space offsets.
- There is no time effectors built in the Shape Layer library; we will use .valueAtTime or group indexes instead to create time delays between instances. Please review Lesson08 – Delays and Loops
- Automate colors offset, using customized color swatches; Please review Lesson07 – Color palette
2. Cascade Strokes
- Create a new Rectangle Shape Layer by double clicking on the Rectangle Tool in the Menu Bar
- Rename Shape Layer> Content> Rectangle 1 to 01
- Navigate down to Shape Layer> Content> 01> Rectangle Path 1> Size and flatten the X size
- Turn off the Fill and change the Stroke Width value to around 80 (for now)
- Add two Repeaters in “01” Group
- Change on the 2nd repeater Copies property to 2,
Transform> Position to 0
Transform> Scale to [-100, 0]
rename the repeater to Mirror.
We will now create a link between the Composition Width Repeater and Stroke Width, so that the screen is always filled with the graphics, whatever the number of repetition is.
- Add an expression to Shape Layer> Content> 01> Repeater 1> Transform> Position, to link the repeater position offset to the number of Copies.
var w = (thisComp.width/2)/i;
[w,value[1]]
- To create a Y offset evolving over time, add a second variable
[w,h]
If we wanted the animation to last 2 seconds, we would write inPoint + 2 instead, or even create an Expression Control to adjust manually with a slider.
- Add an expression to Shape Layer> Content> 01> Stroke 1> Stroke Width
Using Math.ceil will make the stroke size pixel perfect and avoid undesired alpha anti-aliasing problems.
Now if you adjust the repeater copies property, the graphic will adjust automatically to fill the screen with the copies.
- Animate with a linear interpolation Shape Layer> Content> 01> Rectangle Path 1> Position, from -height to 0
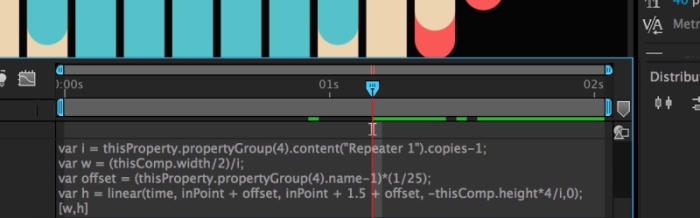
- Modify this expression to add a time delay when duplicating the group
linear(time, inPoint +offset, inPoint +1 +offset, [0,-thisComp.height], [0,0])
When duplicating the Group (“01”), the group name with increment of +1, adding a time delay of 4 frames in between each instances.
- Modify the expression on Shape Layer> Content> 01> Repeater 1> Transform> Position
var h = linear(time, inPoint +offset, inPoint +1.5 +offset, -thisComp.height*4/i,0);
Note I choose this animation to last 50% longer to make the cascading effect more obvious.
- Modify the expression on Shape Layer> Content> 01> Stroke 1> Stroke Width to create gaps in between the bars that will disappear over time
Math.ceil(linear(time, inPoint, inPoint +1.5, w/2,w))
- (Optional) Change Shape Layer> Content> Rectangle 1> Stroke 1> Line Join to Round Join
- (Optional) Apply Xpr_swatches to the composition and xpr_colorShape to the stroke color (from Lesson07 – Color palette) to automatically cycle through colors defined in the palette.
- Duplicate the Group (“01”) as many times as you like

3. Circular Strokes
- Create a new Ellipse Shape Layer by double clicking on the Ellipse Tool in the Menu Bar
- Rename Group (“Ellipse 1”) to (“01”)
- Add an expression to Shaper Layer> 01> Ellipse Path 1> Size
var i=thisProperty.propertyGroup(3).propertyIndex;
var r=(width/n)*i;
[r,r]
That code will determine the size of each Ellipse instance; n will get how many instances are living in the same Shape Layer and i the index of that particular instance (review previous lessons if you don’t get it).
- Add an expression to Shaper Layer> 01> Stroke 1> Stroke Width
var r=thisProperty.propertyGroup(3).content(“Ellipse Path 1”).size[0];
(r/(2*i))
Stroke Width will depend of the number of instances and the Size of that particular instance
- Add an Offset Path object and add an expression to Start property
- Add a Trim Path object and add an expression to Amount
This trick constrains the stroke inside the ellipse and creates a dohnut shape instead of an outlined stroke.
- Add an expression to the End Property and introduce a time delay
linear (time, inPoint +offset, inPoint +1 +offset, 50, 100)
That expression animates over 1 second the stroke, introducing 2 frames delay between instances
- Modify the expression on Shaper Layer> 01> Stroke 1> Stroke Width to thicken the stroke over time and create a “filling gaps” effect
k*(r/(2*i))
this creates a multiplicator that animates doubles the size over time, following the pace of the Trim Path animation.
- Change Shape Layer> Scale to [115,115], to fill the frame
- (Optional) Add an expression to Shaper Layer> 01> Trim Path 1> Offset to introduce a random effector
Returns a random value between 0 and 1 (or specified Max/Min values)
seedRandom(offset, timeless=false)
Random seeds are evaluated relatively to the layer indexes;
use it to offset the values but also to freeze the values in time
random()*50
- (Optional) Add 2 Effect> Expression Controls> Slider Control to manually adjust the randomization and Modify the expression
random()*effect(“Random Strength”)(“Slider”)
Note that to generate a unique seed for each instance, the number of the instance is used to automatically offset it.
- (Optional) Apply xpr_swatches and xpr_colorShape to automatically select colors from a specified color palette
- Duplicate the main Group as many time as desired and adjust random sliders

4. Triangles
- Make a new Polygon Shape by double clicking ont he Polygon Tool in the menu bar
- Change the Polygon Path points to 3 to form a triangle
- Rename the main Group to (“01”)
- Add an expression to Shape Layer> 01> Polygon Path 1> Radius to scale the size of the triangle to match the compostion height by
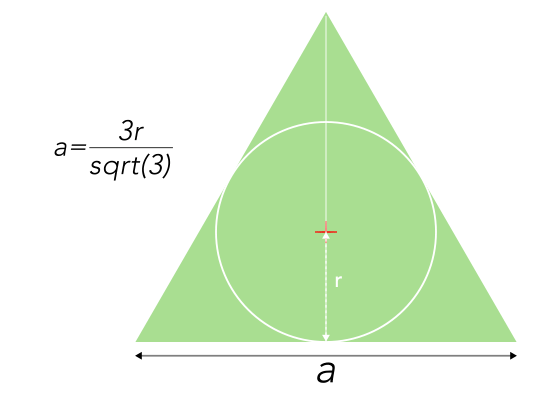
The “Outer Radius” of the triangle in After Effects
refers to the inscribed circle radius
- Recenter the triangle in the compo by adding an expression to Shape Layer> 01> Polygon Path 1> Position
- Add a Repeater in the Group
- Change the Repeater Rotation to 180
- Add an expression to the Position property to offset each iteration (see graphic above about relationship between radius and triangle side)
var a =3*r/Math.sqrt(3);
[a/2,value[1]]
- Add an expression to the Copies property to fill the screen (see graphic above about relationship between radius and triangle side)
var a = 3*r/2/Math.sqrt(3);
thisComp.width/a*2
- Add an expression to the Group (“01”) Position to offset the position to the left edge of the frame
[-thisComp.width/2,-thisComp.height/2+p*(3/2)]
- Add an expression to the Group (“01”) Anchor Point to offset the position to the left edge of the frame
var p = thisProperty.propertyGroup(2).content(“Polystar Path 1”).position[1];
[value[0], r-p]
- Add a second repeater under the 1st one
- Modify the expressions on Polygon Path Radius / Polygon Path Position to scale down the triangle size depending on the number of vertical iterations
- Add an expression on Repeater 2> Position to offset the rows down so that it fills the screen
var a = r*3/Math.sqrt(3);
[-1.5*a, r*3/2]
By adjusting the 2nd Repeater Copies property, it will automatically resize the whole graphic to fit the screen.
- Change Repeater 1> End Opacity to 50%
- To animate the graphic, modify the expression result on the 1st Repeater Copies property with a linear expression
- To add a time delay in between the duplicated instances, modify the expression
linear(time,inPoint +offset,inPoint +1 +offset,0,(thisComp.width/a)*2)
To invert the time delay, so that the top layer is always the last to appear, substract the number of instances to the instance index. If we just use the group index, then the top layer wouls always be the 1st to appear, masking the other groups underneath.
- (Optional) Add the color swatches preset and the apply xpr_colorShape to the Fill object
- Duplicate the main Group as many time as you like.

DON’T FORGET
build your own presets collection to speed up your workflow
Click icon below to download presets (rename .key to .zip after download)

